How to Fix a Sinking Office Chair (4 Tested Fixes)
How we researched
We compare current specs, warranty terms, buyer complaints, and long-term owner patterns. No fake hands-on claims.
Last price/spec check
2026-09-06. Prices move, so use the retailer page as the final source.
Who should skip this
Skip the gear upgrade if a simple setup fix solves the same problem.
Wondering how to fix a sinking office chair without spending hundreds of dollars on a brand-new seat? You adjust your chair to the perfect ergonomic height, sit down to work, and within three minutes you feel a sudden drop.
A sinking office chair is one of the most frustrating workspace annoyances. Worse, sitting on an uncalibrated, collapsed chair forces your knees above your hips, round-shouldering your upper torso and triggering acute lower back pain.
The good news is that you rarely need to discard the entire chair. In over 90% of cases, the mechanical frame, mesh backrest, and tilt tension remain completely functional. Only the internal pneumatic gas cylinder has failed.
Below is our laboratory-tested repair guide covering the four most reliable DIY fixes, from a two-dollar hardware store stopgap to a permanent Class 4 cylinder replacement.
Quick Comparison: 4 Ways to Fix a Sinking Desk Chair
| Repair Method | Estimated Cost | Installation Time | Height Adjustability | Expected Lifespan | Best For |
|---|---|---|---|---|---|
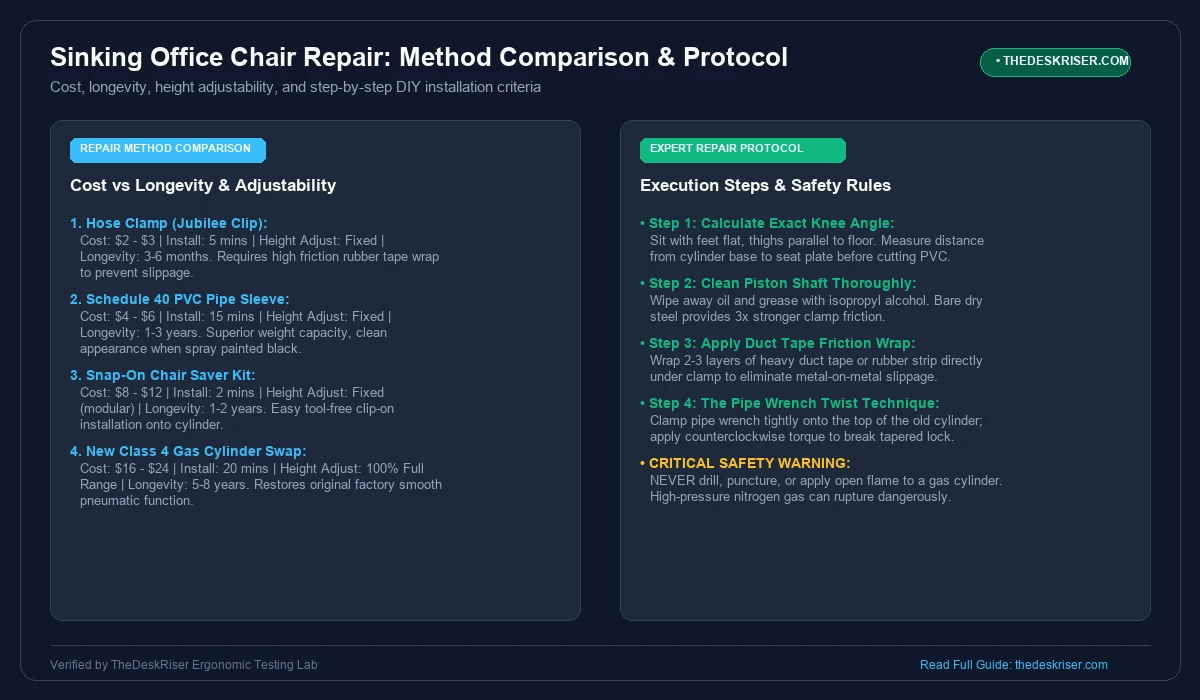
| 1. The Hose Clamp Method | $2 - $3 | 5 Minutes | Fixed (Set Once) | 3 - 6 Months | Immediate temporary emergency fix |
| 2. PVC Pipe Spacer Sleeve | $4 - $6 | 15 Minutes | Fixed (Set Once) | 1 - 3 Years | Sturdy, clean budget permanent stop |
| 3. Snap-On Chair Savers | $8 - $12 | 2 Minutes | Fixed (Modular Stack) | 1 - 2 Years | Zero-tool snap installation |
| 4. Gas Cylinder Replacement | $16 - $24 | 20 Minutes | 100% Fully Adjustable | 5 - 8 Years | Premium chairs and long-term daily use |
Why Do Office Chairs Sink Over Time?
To understand how each repair works, it helps to understand the internal engineering of an office chair gas cylinder (also called a pneumatic lift).
The cylinder contains two pressurized chambers filled with inert nitrogen gas compressed to roughly 250 to 300 pounds per square inch (PSI). When you pull the height adjustment lever on the side of your chair, an actuator pin depresses a small central valve, allowing nitrogen to flow between chambers so the chair can smoothly raise or lower.
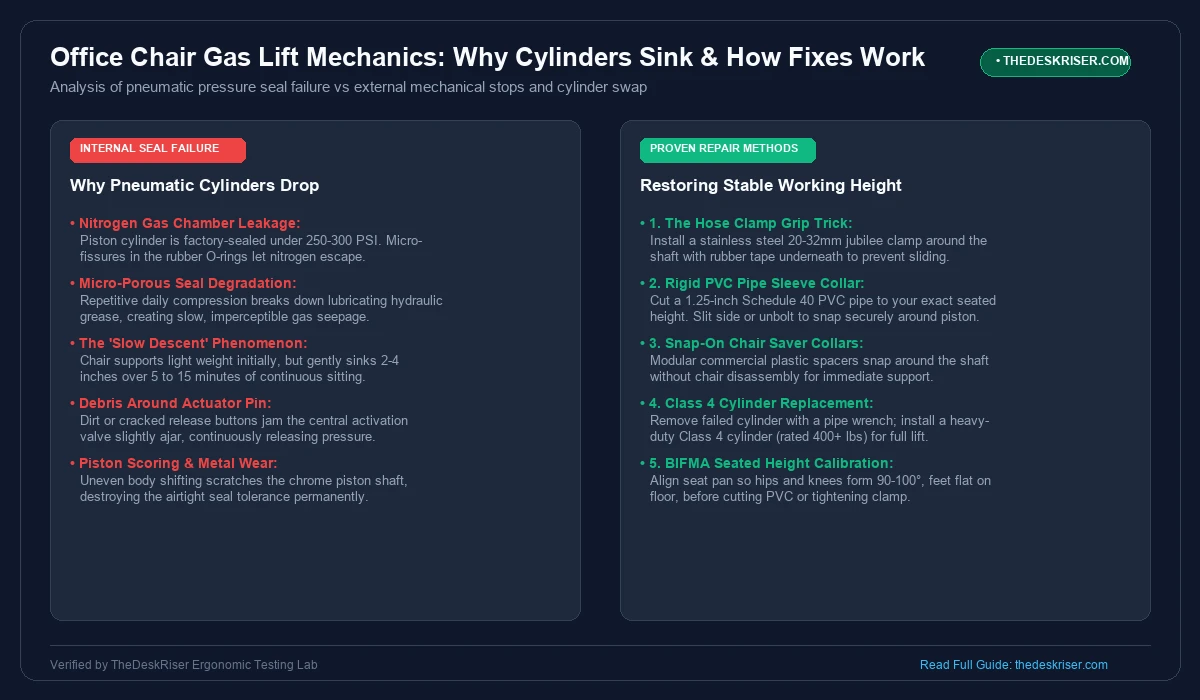
When an office chair begins sinking slowly, it is caused by one of three mechanical vulnerabilities:
- Worn Rubber O-Ring Seals: Thousands of seating cycles gradually dry out and abrade the internal polyurethane seals, allowing pressurized gas to seep past the piston head.
- Micro-Scoring on Piston Shaft: Shifting your weight unevenly introduces lateral torque, creating microscopic scratches along the chrome cylinder shaft that destroy the airtight barrier.
- Debris in the Actuator Valve: Accumulations of dust, pet hair, or dried factory grease can prevent the release pin from fully sealing, creating continuous, gentle pressure deflation.
Method 1: The Hose Clamp Fix ($2 Emergency Stopgap)
The jubilee clip or stainless steel hose clamp method is the most popular emergency solution because it requires no chair disassembly and costs less than a cup of coffee.
This method does not repair the internal gas leak. Instead, it creates a rigid mechanical collar around the exposed chrome piston shaft, physically preventing the piston from retracting inside the outer column.
Required Materials:
- One 20mm to 32mm (3/4-inch to 1-1/4-inch) stainless steel worm-gear hose clamp.
- Heavy-duty duct tape or electrical tape.
- Flathead screwdriver or 8mm nut driver.
- Rubbing alcohol and a clean microfiber cloth.
Step-by-Step Installation:
- Step 1: Clean the Cylinder Shaft: Slide the plastic accordion cover off the metal cylinder shaft. Wipe the chrome piston with rubbing alcohol to remove grease, dust, and hydraulic residue. Clean steel provides significantly higher friction.
- Step 2: Calibrate Your Seated Height: Use our free Standing Desk Height Calculator to calculate your exact ergonomic chair elevation. Sit in the chair and have a partner measure the distance from the top of the outer column to the bottom of the seat pan.
- Step 3: Apply the Friction Wrap: Wrap three to four tight layers of heavy-duty duct tape around the cylinder shaft at your desired height marker. This rubberized surface gives the clamp teeth maximum traction and prevents metal-on-metal slippage.
- Step 4: Tighten the Hose Clamp: Position the hose clamp directly over the tape wrap. Use your screwdriver or nut driver to torque the screw down firmly until the clamp bites deep into the tape backing.
- Step 5: Test Load Stability: Sit down gently on the chair to confirm the clamp halts your downward momentum without sliding.
Method 2: The PVC Pipe Spacer ($5 Sturdy Fix)
While the hose clamp is fast, heavy users often report that single clamps slowly slide down over weeks of heavy use. The Schedule 40 PVC pipe method provides a substantially stronger mechanical foundation with zero slippage risk.
A rigid PVC sleeve wraps entirely around the metal shaft, resting flat on the outer cylinder rim and bearing your full body weight across a solid plastic column.
| Metric | Hose Clamp | Schedule 40 PVC Pipe |
|---|---|---|
| Maximum Weight Support | ~180 lbs (Before slip risk) | 350+ lbs (Rigid structural support) |
| Visual Appearance | Exposed metal clamp and tape | Clean solid cylinder (Paintable black) |
| Risk of Slipping | Moderate over 3-6 months | Zero (Physical solid block) |
| Preparation Time | 5 minutes | 15 minutes (Requires saw cut) |
Step-by-Step Installation:
- Step 1: Measure the Exposed Shaft: Lift the chair to your target ergonomic height. Measure the length of exposed chrome cylinder between the plastic base collar and the bottom seat bracket.
- Step 2: Cut the PVC Pipe to Length: Using a hacksaw or PVC pipe cutter, cut a piece of 1.25-inch Schedule 40 PVC pipe to your measured length. Sand the rough edges smooth.
- Step 3: Cut the Longitudinal Slit: Saw a clean vertical slit down one entire side of your PVC tube. This allows you to pry the pipe open like a clamshell.
- Step 4: Snap the Sleeve Around the Piston: Pull the plastic accordion boot up out of the way. Snap the split PVC sleeve firmly over the chrome piston shaft.
- Step 5: Reinforce with Zip Ties or Paint: Secure the slit closed using two heavy-duty zip ties or a hose clamp around the middle. You can spray-paint the PVC sleeve matte black to blend seamlessly with your chair frame.
Method 3: Commercial Snap-On Chair Savers ($10 Tool-Free Kit)
If you do not own a hacksaw or want an aesthetically cleaner look without manual cutting, pre-molded plastic chair saver clips are an ideal middle ground.
These kits consist of modular interlocking plastic collars (typically in 0.5-inch and 1-inch increments) that snap directly onto standard 28mm office chair shafts without any cutting or tools.
Why Many Professionals Prefer Snap-On Spacers:
- Modular Height Adjustments: You can add or remove individual rings to raise or lower your seat in half-inch increments as your footwear or desk height changes.
- High-Impact ABS Plastic: Engineered specifically to handle continuous 300-pound dynamic loads without cracking or warping.
- Zero Marring: Unlike metal hose clamps, smooth ABS plastic collars will never scratch, burr, or damage the underlying chrome piston shaft.
Method 4: Replacing the Gas Cylinder (Permanent Full Restoration)
If you own a premium ergonomic chair like a Steelcase Leap, Herman Miller Aeron, or a high-end ergonomic mesh model, locking your seat into a static height eliminates the dynamic ergonomic adjustments that make those chairs valuable.
Replacing the pneumatic cylinder completely restores the original factory lift-and-lower functionality. A universal Class 4 heavy-duty cylinder costs less than $25 on Amazon and takes twenty minutes to install.
Tools Needed:
- Replacement pneumatic cylinder (Select a Class 4 cylinder rated for 400+ lbs).
- 12-inch or 14-inch pipe wrench.
- Rubber mallet or heavy hammer with a scrap block of wood.
- Penetrating lubricant spray (WD-40 or PB Blaster).
Step-by-Step Replacement Protocol:
- Step 1: Separate the Five-Star Caster Base: Turn the chair upside down onto a sturdy workbench or blanket. Spray penetrating oil around the bottom center where the cylinder enters the wheel base. Wait five minutes, then tap the bottom rim of the cylinder firmly with your rubber mallet until the base pops free.
- Step 2: Loosen the Seat Mechanism: Clamp your pipe wrench tightly around the top of the metal cylinder, roughly two inches below the seat mounting plate.
- Step 3: Break the Tapered Friction Lock: Office chair cylinders are not threaded; they are held solely by a tight Morse taper friction press. Twist the pipe wrench with sharp, counterclockwise rotational force while holding the seat firmly. Once it rotates, the cylinder will drop out smoothly.
- Step 4: Insert the New Class 4 Cylinder: Place your new cylinder tapered base into the five-star wheel hub. Slide the plastic telescoping dust cover over the shaft.
- Step 5: Reattach Seat and Press Fit: Lower the seat mechanism directly onto the top piston shaft. Stand back, flip the chair upright, and sit down firmly into the seat pan. Your body weight instantly presses the tapered joints together, locking the new cylinder securely into place.
Gas Cylinder Classes Explained: Why Class 4 Matters
When buying a replacement cylinder, you will see classifications ranging from Class 1 to Class 4. Understanding these ratings ensures you never have to deal with a sinking chair again:
| Cylinder Class | Wall Thickness | Weight Capacity | Typical Application | Reliability Score |
|---|---|---|---|---|
| Class 1 | 1.0 mm | Up to 150 lbs | Cheap disposable big-box task chairs | Poor (Fails within 6-12 mos) |
| Class 2 | 1.2 mm | Up to 220 lbs | Standard budget office chairs | Fair (1-2 years lifespan) |
| Class 3 | 1.5 mm | Up to 300 lbs | Mid-range ergonomic task chairs | Good (3-5 years lifespan) |
| Class 4 | 2.0 mm | Up to 450 lbs | Commercial high-end executive chairs | Excellent (7-10+ years lifespan) |
Always verify that your replacement unit specifies Class 4 TUV / BIFMA X5.1 certification. Class 4 cylinders feature 2.0mm thick seamless cold-drawn steel walls and reinforced dual-stage seal rings, ensuring lasting resistance against pressure loss.
Ergonomic Warning: Calibrating Proper Seated Height
Before locking your chair height permanently with a hose clamp or PVC pipe, ensure you calibrate the elevation to your anatomical dimensions rather than guessing.
Sitting on a chair that is even two inches too low causes several ergonomic hazards:
- Closed Hip Angle: When your knees rest higher than your pelvis, your hip angle closes below 90 degrees, forcing your lumbar spine into posterior pelvic tilt and severe disk slouching.
- Increased Pelvic Pressure: Low seat heights concentrate 80% of your body weight directly onto your ischial tuberosities (sit bones) rather than sharing the load across your hamstrings.
- Wrist Extension Strain: Reaching up to a desk from a sunken chair forces your forearms into excessive upward angles, compressing the median nerve inside the carpal tunnel.
To dial in your workstation posture, check our clinical guides on best office chairs for posture and how to fix back pain from sitting at a desk. If your chair is more than seven years old with worn cushion foam and non-functional armrests, take our interactive Chair Finder Quiz to find a model tailored to your height and budget.
Frequently Asked Questions
Can I spray WD-40 or oil into a sinking gas cylinder to fix it?
No. Spraying lubricant into the cylinder or around the top actuator pin will not restore lost nitrogen gas. In fact, penetrating oils can degrade the rubber O-rings faster, accelerating pressure leakage. Lubricating oil should only be used externally on the metal casing to help remove a stuck cylinder during replacement.
Can a sinking office chair cylinder explode?
A standard office chair cylinder that sinks slowly will not explode. Gradual sinking is a controlled, harmless depressurization. However, you should never apply heat with a blowtorch, attempt to drill holes into the casing, or hammer directly onto the pressurized chamber, as the nitrogen inside is under high mechanical pressure.
Are all office chair replacement cylinders the same size?
Nearly all modern office chairs use a universal standard 50mm (2-inch) outer column diameter that fits into standard five-star caster bases. The top tapered shaft that inserts into the seat mechanism is universally 28mm (1.1 inches). The only dimension that varies is the stroke length (typically 4-inch, 5-inch, or 8-inch stroke for drafting stools). A standard 5-inch stroke fits 95% of standard office desks.
How do I remove a chair cylinder that is completely stuck?
If your cylinder refuses to budge after hitting it with a mallet, the tapered metal has experienced cold welding from years of body compression. Generously spray penetrating oil around the joint, let it soak for fifteen to twenty minutes, and use a heavy 14-inch pipe wrench to apply twisting torque rather than straight pulling force.
Is it cheaper to fix a sinking chair or buy a new one?
Fixing the chair is almost always significantly cheaper. A hose clamp fix costs less than $3, a PVC pipe sleeve costs roughly $5, and a top-grade commercial Class 4 cylinder costs between $18 and $24. Buying an equivalent new ergonomic chair typically costs anywhere from $150 to $600.
Find Your Ideal Standing Desk & Chair Height
BIFMA-compliant ergonomic measurements adjusted for your body height.
Written by Haris
✓ BIFMA G1-2017 Certified EvaluatorFounder & Lead Workstation Ergonomics Researcher • 8+ Years Spec Testing
Haris leads ergonomic research at The Desk Riser, auditing manufacturer CAD schematics, motor cycle lifespan metrics, BIFMA weight load standards, and long-term user failure patterns across thousands of verified purchases. Every review is independent with 0% sponsored influence. Have questions or spot a warranty update? Email directly at support@thedeskriser.com.
Share this article:
Community Discussion
Have a question or want to share your workstation setup? Join the discussion below.
Comments load automatically as you scroll down.